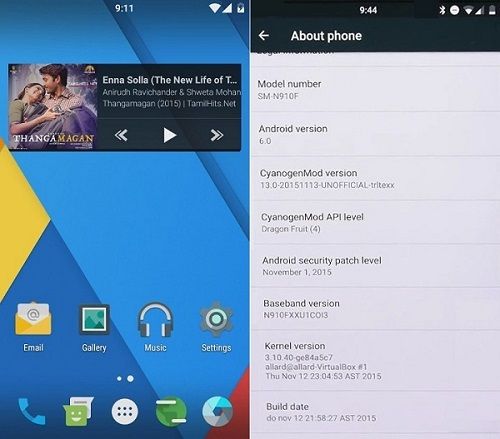
This custom ROM will give your phone a complete Marshmallow experience without a single lag. It is completely stable and much fast than CM 12. This Cyanogenmod unofficial firmware can be flashed only on Samsung Galaxy Note 4 International variant. In this detailed step-by-step guide, we’ll update your Samsung Galaxy Note 4 SM-N910F to Cyanogenmod 13 custom ROM. This ROM is powered by AOSP Android Marshmallow. That means you’ll experience no more pre-loaded bloatware or Samsung Touchwiz UI. The UI is pure and similar to what we can notice in Nexus devices. All thanks go to members of the Cyanogenmod community for developing this amazing ROM. This Cyanogenmod 13 ROM is based on Android 6.0 Marshmallow.
If you face any bugs or issues, then don’t panic as all those issues will be cleared up in the next updated build. If you are eager to enjoy and experience this beautiful ROM on your NOTE 4 then head on to our actual article on how to install Android 6.0 Marshmallow CM 13 on Galaxy Note 4 SM-N910F/G given below.
Disclaimer
Proceed at your own risk. Neither we at Droid Thunder nor the developers of this ROM will be responsible for any damage whatsoever. Although there are fewer chances of damage, still follow all the steps carefully.
Compatibility
This Android 6.0 Marshmallow based Cyanogenmod 13 custom ROM is only for Samsung Galaxy Note 4 with model number SM-N910F or SM-N910G. Do not try to flash it on any other phone or variant.
Requirements
Charge your device to a minimum of 60%. Take a backup of your contacts, messages, apps, call logs, etc. for safety. Backup EFS folder present in your phones system directory. Enable USB debugging mode from the mobile settings. Also, install Samsung USB Drivers on your computer. Root Galaxy Note 4 before going ahead.
Steps to install CWM Recovery on Galaxy Note 4 N910F
Download and extract this CWM recovery file on your computer. Do not extract this CWM 6.0.5.1 recovery file. Power off your Galaxy Note 4 and boot into downloading mode. Press and hold the ‘Home Button + Volume down key + Power Button’ simultaneously until you see a warning message. Leave all the three keys now. Keeping the phone as it is, connect it to your PC using the USB cable. Now just press Volume Up key to continue. This will directly land you into downloading mode. On PC, launch ‘Odin Multi Downloader3-v3.10.7′ software which you’ve just received after extraction. As soon as you open it, the ID: COM section located at the top left corner will turn light blue. Besides, an Added message will appear in the message box window. This will confirm that your phone has successfully connected to the PC. But if this thing doesn’t happen then re-install the mobile specific drivers on your PC. Moreover, tick Auto Reboot and F.Reset options on the Odin window. Now, tick against the ‘AP’ button and navigate to the CWM 6.0.5.1 package (.tar) & select it. Just hit the Start button to initiate the CWM flashing process. Furthermore, the process will take a few minutes to complete. As soon as it gets finished, the ID: COM section on the Odin window will turn green with the message ‘Pass’ below it. That’s all! You’ve successfully flashed the latest CWM recovery on your Galaxy Note 4 smartphone. Let’s flash the actual Android 6.0 Marshmallow ROM now.
Downloads
Cyanogenmod 13 Google Apps
Steps to install CM 13 on Galaxy Note 4 N910F
Download both the zip package files in a specific folder on your computer. Remember not to extract them. Using USB data cable connect your mobile to PC and copy the downloaded files on your phone’s storage. You may directly download both the files on your device. Then safely disconnect your phone from the computer & switch it off completely. Now boot your phone into CWM recovery mode. For doing so, press and hold the Volume up + Home button + Power button together till you enter recovery mode. As you land into recovery mode, make a complete Nandroid backup. After taking Nandroid backup, you need to wipe the data and cache partitions from your phones internal memory. To do so, navigate to the ‘wipe data/factory reset’ option present on the recovery mode and select it. On the next screen press Yes option to start the wiping process. Similarly, navigate to the ‘wipe cache partition’ option on the recovery mode and select it to wipe the caches. This step will clear out all your data, so a complete backup of everything must be done before implementing this step. After wiping completes, select the Advanced option located on the recovery mode. On the next screen, select the Reboot Recovery option. Wait until you boot again into recovery. Let’s move to the actual Android 6.0 Marshmallow based Cyanogenmod 13 ROM flashing process. Besides, navigate to the ‘install zip from SD card’ option present on the recovery mode. Then on the next screen select ‘choose zip from SD card’ option. Moreover, this will show all the data present on your internal/external storage. Then select the Android 6.0 Marshmallow based CM 13 ROM which you’ve just copied earlier. On the next screen select the ‘Yes’ option to initiate the actual CM 13 ROM flashing process. The process will hardly take a minute to complete. So be patient and wait for the process to finish successfully. After the process completes, a successful message will appear on the screen. Then again select ‘wipe data/factory reset’ option and ‘wipe cache partition’ option. Similarly, flash the Google Apps (GApps) package as you’ve flashed this CM 13 custom ROM. Furthermore, do not wipe data/cache after flashing Google Apps. Just restart your Galaxy Note 4 N910F by selecting ‘reboot system now’ option from the recovery mode. The first boot will take more time to start than usual. But don’t panic after a couple of boots it’ll be normal.
Conclusion
Finally! This is how you can install Cyanogenmod 13 custom ROM on your Samsung Galaxy Note 4 N910F/G smartphone. To confirm the same navigate to Menu > Settings > About Phone. Do comment below if you face any difficulty. Notify me of follow-up comments by email. Notify me of new posts by email.
Δ


