This is necessary as implementing such complicated flashing is risky and may increase the possibility of soft bricking your phone. Besides, I always recommend our all Android users make a complete backup of their custom/stock firmware before executing any flashing process.
What is NANDroid Backup?
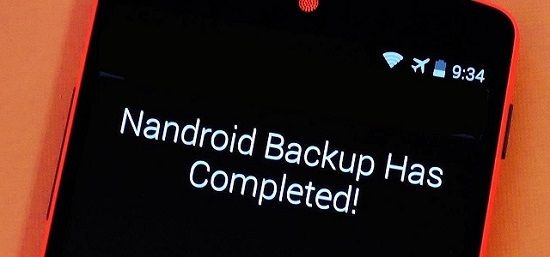
Nandroid backup is a backup that creates a mirror image of the current state of your firmware to an image file that includes a complete backup of the whole operating system of your device along with system data, user data, boot image, kernels, installed apps with data, contacts and even the accounts created. Thus a backup can be used to restore your device to an exact state and thus proves as a lifesaver in case if something goes wrong. Moreover, many people prefer apps like Titanium backup for taking regular backups but it should be noted that no app can save every tiny detail of your phone as backup does. In this article, we’ll see some easy methods on how to take complete Nandroid backup and restore of any Android Phone.
Disclaimer
Try at your own risk. We’ll not be held responsible if your phone gets damaged by following these methods.
How to take Nandroid Backup on Android
In this guide, we’ll go through eight methods to make the Nandroid method on Android phones. You can use either of them. Let’s get straight into the process.
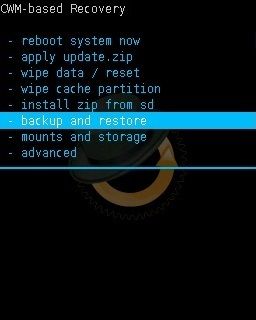
Method 1: Clockworkmod Recovery
At first, we’ll use CWM recovery to make a Nandroid backup on Android.
Steps to take a Nandroid backup using CWM recovery
Switch off your phone and boot into CWM recovery. Select the backup and restore option.
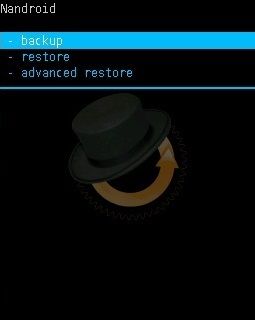
On the next screen, select the backup option.
As soon as you select it, the backup process will start. Be patient and wait for the process to complete. It’ll hardly take few minutes to complete.
The backup will be saved in a folder named ‘Clockworkmod/backup’ on your device’s internal or external storage. It depends on what location you choose while creating the backup. Take backup on external storage as data present on internal need to be wiped sometimes. Just restart your phone by selecting reboot system now option.
Steps to restore Nandroid backup using CWM recovery
Switch off your device and boot into CWM recovery mode. Select the backup and restore option. Next, select the Restore option. Furthermore, from the list of saved backup files, select the one you want to restore. As soon as you select it, the restore process will begin. It’ll last for a few minutes. After complete restore, restart the phone by selecting reboot system now option.
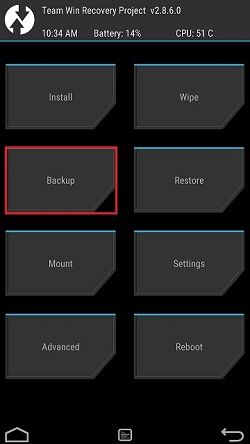
Method 2: TWRP Recovery
In this method, we’ll use TWRP custom recovery and make a backup.
Steps to take a Nandroid backup using TWRP recovery
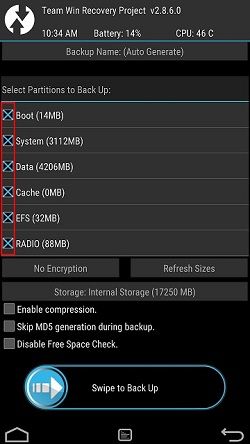
Switch off your phone and boot into TWRP recovery mode. Tap on the Backup option present on the main screen.
On the next screen, select the partitions you want to backup.
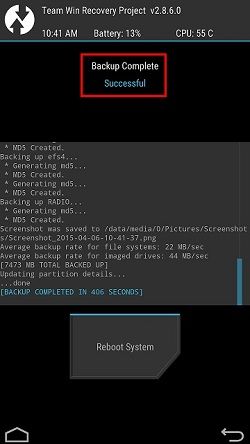
At the bottom, just swipe right to begin the backup process. The backup process will take a few minutes to complete. Upon completion, a successful message will appear on the screen.
Simply restart your phone by selecting Reboot System option.
Steps to restore Nandroid backup using TWRP Recovery
Switch off your phone and boot into TWRP recovery mode. Select the Restore option. This will show up the saved Nandroid backup files. Hence, select the one you want to restore. Finally, swipe right to start the restore process. Upon completion, restart the phone by selecting Reboot System option.
Method 3: Online Nandroid Backup App
Here, we’ll use the Online Nandroid Backup Apk to take a Nandroid Backup on Android. Let’s get into it.
Steps to take a Nandroid backup using the Online Nandroid Backup app
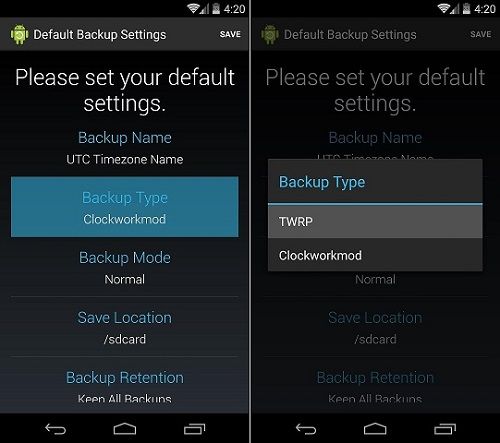
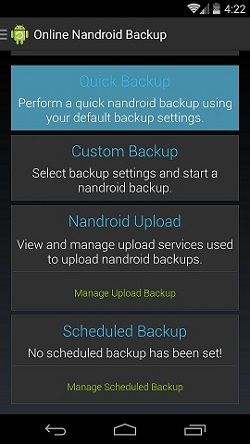
Download and install the Online Nandroid Backup App on your phone. Then you need to configure various default setting options. Select the Backup Name and Backup type. By default, it is set to Clockworkmod but if you’ve TWRP installed on your phone, you can set it to TWRP.
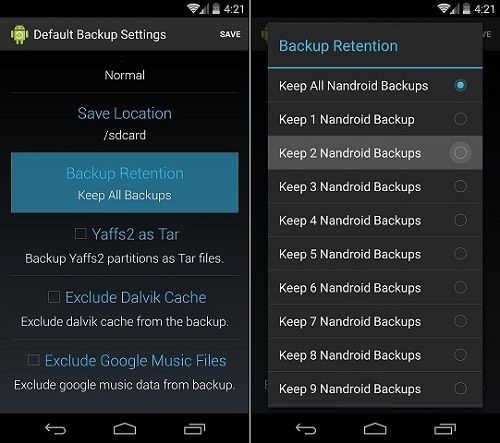
Similarly, select the Backup Mode, and Location as per your need. The Backup Retention option allows you to set how many backups you’d like to keep before older backups are overwritten with the latest ones. Since the backup file is quite big, we prefer to set this value to 1 or 2.
Finally, there are few more options for excluding Dalvik caches or music files, but keep them as they are. After configuring everything, click on the Save button present at the top-right corner. From the main screen, tap on the Quick Backup option.
Then tap on the Start Backup option. This will start the Nandroid backup process. You can even see the overall process through the status bar notifications. This is the easy way to make a Nandroid backup without root.
Method 4: ROM Manager App
In this method, we’ll use the ROM Manager apk to make a Nandroid backup on Android.
Steps to take a Nandroid backup using ROM Manager app
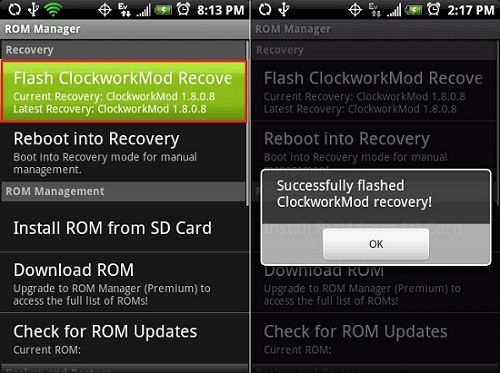
Download and install the ROM Manager app on your phone. Select the Flash Clockworkmod Recovery option to install the CWM recovery.
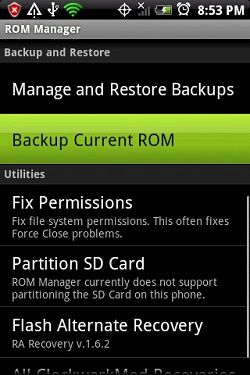
Moreover, select the Backup current ROM option.
Your phone will boot itself and the Nandroid backup process will begin.
Finally, the backup file will be created on your SD card in the ClockworkMod/backup/ directory.
Steps to restore Nandroid backup using ROM Manager app
Launch the ROM Manager app. Select the Manage and Restore Backup option. The list of saved backup files will show up. Just select the one you want and click on the Restore option. Finally, this will start the restore process.
Method 5: Orange Backup App
In this method, we’ll use the Orange backup apk to make a Nandroid backup on Android. Let’s start the process.
Steps to take a Nandroid backup using the Orange backup app
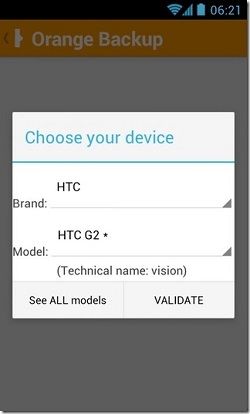
Download and install Orange Backup App on your phone. Launch the app and verify your device brand and model.
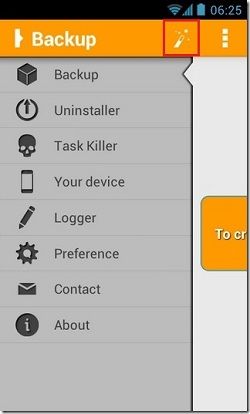
To start the Nandroid backup process, hit the magic wand button present on the app’s main interface.
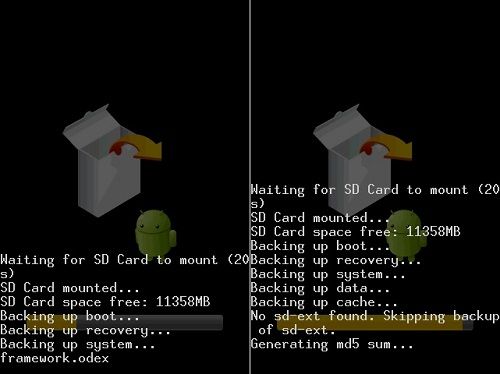
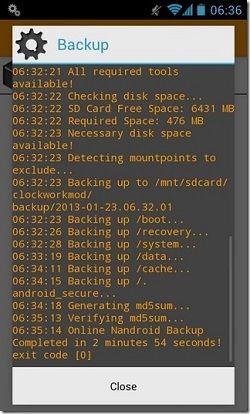
Finally, the backup process will begin. The app will back up the data, compress it, generate MD5 checksums, and upload it on the cloud.
The app will keep you informed of the overall progress through the status bar notifications.
Method 6: OnAndroid zip file
Here, we’ll use the On Android zip file to make a backup.
Steps to take a Nandroid backup using On Android zip
Download the OnAndroid zip file on your phone. Flash the OnAndroid zip file from your CWM/TWRP recovery. Now, install and launch the Terminal Emulator app on your phone. Type this command in it and press enter:
su
Furthermore, enter the below command:
onandroid
This will start the backup process. If you are getting error mkyaffs2image not found in the path, then flash this zip file from recovery. Also if you are getting an error dedupe not found in the path, then flash this zip file.
Method 7: ADB commands
In this method, we’ll go through easy steps on how to take Nandroid backup directly to PC.
Step to take a Nandroid backup directly to PC
Install ADB drivers on your PC. Also, install the Busybox app on your Android phone. Moreover, enable USB Debugging mode from the device settings. Connect the phone in ADB mode and unlock the screen. Open one Cygwin Terminal and enter the following code:
Now the phone will wait to send the block over the network. Then open another Cygwin terminal and type:
Finally, this will back up your whole phone in raw format.
Method 8: Script Manager App
Here, we’ll use the Script Manager app to make a backup on Android.
Steps to take a Nandroid backup using Script manager app
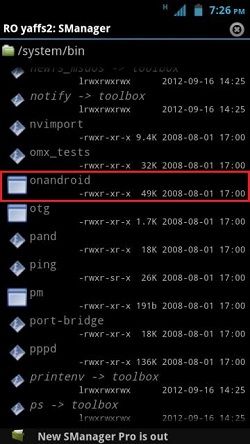
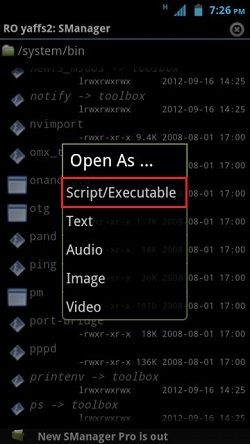
Flash the OnAndroid zip file from recovery. Then install and launch the Script Manager App on your phone. In the app, go to /system/bin and select OnAndroid.
As you select it, a popup window will appear, from which select the Script/Executable option.
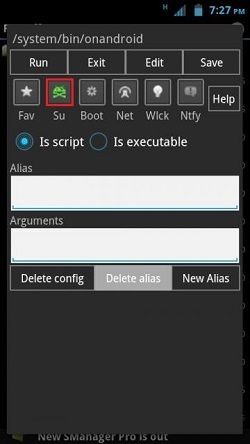
Then select the Su button at the top.
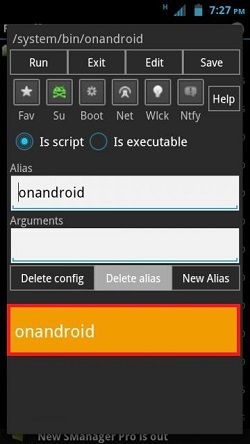
Type alias name you want or leave as it is. On the other hand, type any arguments you want to pass, in the arguments box. After doing everything as mentioned click on the Save button on the top right corner. As soon as you save it, Alias name will appear in orange color.
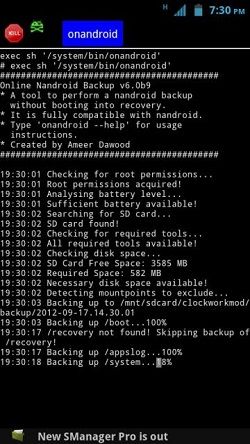
Now click on the Run button to start the backup process.
Conclusion
Finally! This is how you can take Nandroid backup and restore. If you face any difficulty, then do inform me through the comments. Notify me of follow-up comments by email. Notify me of new posts by email.
Δ